The worst circuit in the world

“The most miserable latch that’s ever been designed in the history of mankind or before.”

Astronaut Jack R. Lousma commenting on some equipment issues during the NASA Skylab 3 mission (July to September 1973), quoted in Cooper 1976: 41

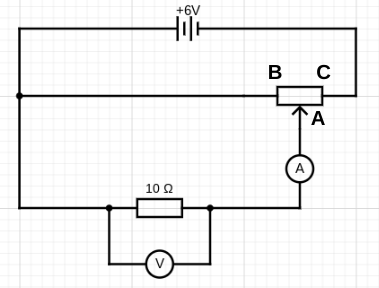
What does the worst circuit that’s ever been designed in the history of humankind or before look like? Without further ado, here it is:

‘But wait,’ I hear you say, ‘isn’t this the circuit intended for obtaining the data for plotting current-potential difference characteristic curves as recommended by the AQA exam board in their GCSE Physics and GCSE Combined Science specifications?’ (AQA 2018: 47)

Sadly, it is indeed.

Why is ‘the standard test circuit’ a *bad* circuit?

The point of this required practical is to get several paired readings of potential difference across a component and the current through a component to enable us to plot a graph (aka ‘characteristic’) of current against potential difference. Ideally, we would like to start at 0.0 volts across the resistor and measure the current at (say) 1.0, 2.0, 3.0, 4.0, 5.0 and 6.0 volts. That is to say, we would like to treat the potential difference as the independent variable and adjust it in consistent, regular increments.

Now let’s say we use a typical school rheostat such as the one shown below as the variable resistor in series with the 10 ohm resistor. The two of them will behave as a potential divider circuit (see here and here for posts on this topic).

The resistance of the variable resistor can be varied between 0 and 16 ohms by moving the slider. When the slider is at A it will have the maximum resistance of 16 ohms and zero when it is at C, and in-between values at any other point.

A typical school rheostat. To use as a simple variable resistor, connect only terminals A and C into the circuit. (Please note: using terminals B and C will make it behave as a fixed resistor.)

When the slider is at C, the 10 ohm resistor gets the full potential difference from the supply and so the voltmeter will read 6.0 V and the ammeter will read (using I=V/R) 6.0 / 10 = 0.6 amps.

When the slider is at A, the total resistance of the circuit is 10 + 16 = 26 ohms so the ammeter reading (again using I=V/R) will be 6.0/26 = 0.23 amps. This means that the voltmeter reading (using V=IR) will be 0.23 x 10 = 2.3 volts.

This means that the circuit as presented will only allow us to obtain potential differences between a minimum of 2.3 V and a maximum of 6.0 V across the component by moving the slider between B and C, which is less than ideal.

‘It is a far, far better circuit that I build than I have ever built before…’

It is a far, far better thing that I do, than I have ever done.

Charles Dickens, ‘A Tale of Two Cities’

This circuit is a far better one for obtaining the data for a current-potential difference graph. This is because we can access the full 0.0 V to 6.0 V of the supply simply by adjusting the position of the rheostat slider. The rheostat is being used as a potential divider in this circuit rather than as a simple variable resistor.

When the slider is at B, the voltmeter will read 0.0 V and the current through the 10 ohm resistor will be 0.0 amps. A small movement of the slider from B towards C will increase the reading of the voltmeter to (say) 1.0 V and the ammeter would read 0.1 A. Further small movements of the slider will gradually increase the potential difference across the resistor until it reaches the full 6.0 V when the slider is at C.

A-level Physics students are expected to be able to use this circuit and enumerate its advantages over the ‘worst circuit in the world’.

And, to be fair, AQA do suggest a workaround that will allow GCSE student to side-step using ‘the worst circuit in the world’:

If a lab pack is used for the power supply this can remove the need for the rheostat as the potential difference can be varied directly. The voltage should not be allowed to get so high as to damage the components, check the rating of the components you plan to suggest your students use.

AQA 2018: 16
A ‘lab pack’ i.e. a power supply with a variable output potential difference

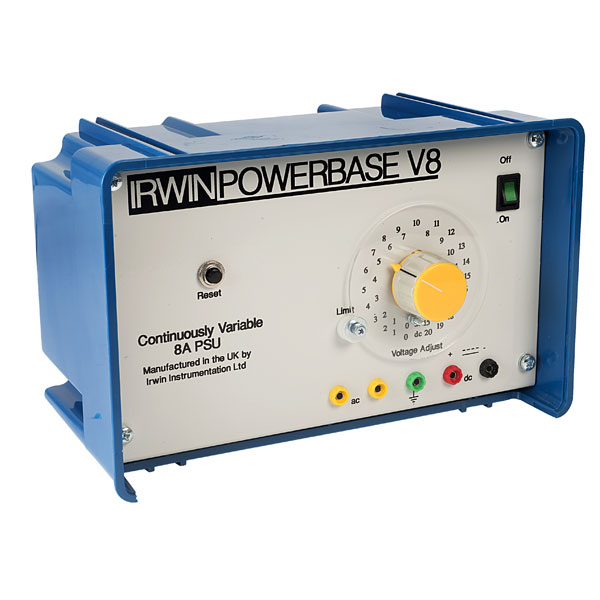
If this method is used, then in effect you would be using the ‘built in’ rheostat inside the power supply.

So why not use the superior potential divider circuit at GCSE?

The arguments in favour of using ‘the worst circuit in the world’ as opposed to the more fit for purpose potential divider circuit are:

  1. The ‘worst circuit in the world’ is (arguably) conceptually easier than the potential divider circuit, especially if students have not studied series and parallel circuit before. This allows more freedom in sequencing when IV characteristics are taught.
  2. A fuller range of potential differences can be accessed even using the ‘worst circuit in the world’ if the maximum value of the variable resistor is much larger than the resistance of the component. For example, if we used a 0 – 1 kilo-ohm variable resistor in series with the 10 ohm resistor then very fine adjustments of the variable resistor would allow a suitable range of potential difference to be applied across the component.
  3. Students are often asked direct questions about the ‘worst circuit in world’.
Question from AQA Paper 1 (2021) where students who have used ‘the worst circuit in the world’ for their investigation would (imo) have an advantage over those that have not.

In the next post, I will outline how I introduce and teach this required practical — using, to my shame, ‘the worst circuit in the world’ — and also supply some useful resources.

You can read part 2 here.

REFERENCES

AQA (2018). Practical Handbook: GCSE Physics. Retrieved from https://filestore.aqa.org.uk/resources/physics/AQA-8463-PRACTICALS-HB.PDF on 7/5/23

Cooper, H. S. F. (1976). A House In Space. New York: Bantam Books

Dual coding change of momentum

Rosencrantz (an anguished cry): CONSISTENCY IS ALL I ASK!

Tom Stoppard, Rosencrantz and Guildenstern Are Dead (1966)

I think that dual coding techniques can be extremely helpful in helping students understand the concept of change of momentum.

To engage our students’ physical intuitions, let’s consider a question like: Which would hurt more — being hit by a sandbag or being hit by a rubber ball?

Let’s assume that the sandbag and rubber ball have the same mass m and are travelling at the same initial velocity u. We choose ‘u‘ because it’s the initial velocity and we take ‘v‘ as the final velocity: a very subtle piece of dual coding that can reap rewards if applied consistently — pace Rosencrantz(!) — over a range of disparate examples.

To analyse this problem, let’s use the momentum version of Newton’s Second Law of Motion.

We will use the change = final – initial convention (‘Consistency is all I ask!’)). The initial momentum is pi and the final momentum is pf.

Now let’s work out the change in momentum in each case. We will assume that each item is dropped so that it impacts vertically on a horizontal surface. The velocity just before it hits is u so its initial momentum pi is given by pi = mu; its final velocity is v so its final momentum pf is given by pf = mv. The sandbag does not rebound, so its final velocity v is zero.

The rubber ball rebounds from the surface with a velocity v (we have shown that v < u so we are not assuming a perfectly elastic collision).

We will use the down-is-positive convention so that u is positive and the downward momentum pi are positive in both cases. However, the velocity v of the ball is negative so the momentum pf = mv is negative (upwards).

To add vectors, we simply put them ‘nose to tail’. However, in this case, we need to subtract the vectors, not add them. To do this, we use the operation pf + (-pi,). In other words, we put the vector pf nose to tail with minus pi, or with a vector pointing in the opposite direction to the original vector pi. These are shown in the table.

We can see that the change in momentum Δp is larger in the case of the rubber ball.

Applying Newton Second Law that force = change in momentum / change in time then (assuming the time of each interaction is the same) then we can conclude that the (upward) force exerted by the surface on the ball is larger than the force exerted by the surface on the sandbag.

From Newton’s Third Law (that if an object A exerts a force on object B, then object B exerts an equal and opposite force on object A), we can also conclude that the rubber exerts a larger downward force on the surface. This implies that, if the ball hit (say) your hand, then it would hurt more than the sandbag.

Considering change of momentum problems like this helps students answer questions such as the one shown below:

Exam question on change in momentum (solid black arrow and red arrow added)

We can discard options C and D since the change of momentum shown is in the wrong direction: the vertical component of momentum will remain unchanged.

A and B show changes of momentum of the same magnitude in the horizontal direction. However, if we take the horizontal component of the initial momentum as positive then the change of momentum on the gas particle must be negative; this implies that the correct answer is B.

Note also that diagram B shows the pf + (-pi) operation outlined above, with the arrow showing minus pi shown in red (added to the original exam question).

Just a moment . . .

Many years ago, I was taught this compact and intuitive convention to show turning moments. I think it should be more widely known, as it not only is concise and powerful, but also meets the criterion of being an effective form of dual coding which is helpful for both GCSE and A-level Physics students.

Let’s look at an example question.

Let’s start by ‘annotating the hell’ out of the diagram.

We could take moments around any of the marked points A-E on the diagram. However, we’re going to take moments around B as it enables us to ignore the upward reaction force acting on the rule at B. (This force is not shown on the diagram.)

To indicate that we’re going to be considering the sum of the clockwise moments about point B, we use this intuitive notation:

If we consider the sum of anticlockwise moments about point B, we use this:

We lay out our calculations of the total clockwise and anticlockwise moments about B as follows.

We show that we are going to apply the Principle of Moments (the sum of clockwise moments is equal to the sum of anticlockwise moments for an object in equilibrium) like this:

The rest, as they say, is not history but algebra:

I hope you find this ‘momentary’ convention useful(!)

Showing complex energy transfers using bar models

Real life energy transfers can be messy. That is to say, they are complicated and difficult to understand. I think many students get lost in the dense forest of verbiage that has to be deployed to describe their detail and nuance. Bar models are, I think, an effective teaching tool to avoid cognitive overload, especially for GCSE Physics and Combined Science students.

Windmills of our minds

As an example, let’s consider a wind turbine used to generate electricity. As a starting point, let’s think about how much of the kinetic energy ‘harvested’ by the blades is transferred to the generator. The answer is, of course. not as much as we would hope. The majority is, hopefully, but a significant proportion is unavoidably lost via work done by friction to the thermal energy store of the gears.

This can be shown in a visually impactful way using the Bar Model approach:

Note that in this style of energy transfer diagram, the Principle of Conservation of Energy is communicated visually via the width of the bars. The bottom ‘End’ bar has to be exactly the same width as the top ‘Start’ bar.

What happens if a helpful maintenance engineer tops up the oil reservoir of the wind turbine? Well, we have a much happier situation, as shown below.

As we can see, a much greater proportion of the total energy is transferred usefully (and can be used to generate electrical power) in a well-maintained wind turbine.

Using energy efficient appliances in the home

How can we explain the advantages of using more efficient appliances in the home?

A diagram like this can help. The household that uses less efficient appliances has to buy more energy from their energy supplier to achieve exactly the same outcomes as the first. This is both more costly for the household as well as demanding that more resources are needed to generate electricity for no good reason.

Parachute vs. no parachute

Exactly the same amount of energy is transferred from the gravitational energy store of a parachutist whether their parachute deploys successfully or not. However, in the case of a successful deployment, much more energy is transferred into the thermal energy store of the surroundings than into their kinetic energy store. This helps ensure a safe landing!

Introducing vectors (part 1)

I think that teaching vectors to 14-16 year olds is a bit like teaching them to play the flute; that is to say, it’s a bit like teaching them to play the flute as presented by Monty Python (!)

Monty Python (1972), ‘How to play the flute’

Part of the trouble is that the definition of a vector is so deceptively and seductively easy: a vector is a quantity that has both magnitude and direction.

There — how difficult can the rest of it be? Sadly, there’s a good deal more to vectors than that, just as there’s much more to playing the flute than ‘moving your fingers up and down the outside'(!)

What follows is a suggested outline teaching schema, with some selected resources.

Resultant vector = total vector: the ‘I’ phase

‘2 + 2 = 4’ is often touted as a statement that is always obviously and self-evidently true. And so it is — arithmetically and for mere scalar quantities. In fact, it would be more precisely rendered as ‘scalar 2 + scalar 2 = scalar 4’.

However, for vector quantities, things are a wee bit different. For vectors, it is better to say that ‘vector 2 + vector 2 = a vector quantity with a magnitude somewhere between 0 and 4’.

For example, if you take two steps north and then a further two steps north then you end up four steps away from where you started. Also, if you take two steps north and then two steps south, then you end up . . . zero steps from where you started.

So much for the ‘zero’ and ‘four’ magnitudes. But where do the ‘inbetween’ values come from?

Simples! Imagine taking two steps north and then two steps east — where would you end up? In other words, what distance and (since we’re talking about vectors) in what direction would you be from your starting point?

This is most easily answered using a scale diagram.

To calculate the vector distance (aka displacement) we draw a line from the Start to the End and measure its length.

The length of the line is 2.8 cm which means that if we walk 2 steps north and 2 steps east then we up a total vector distance of 2.8 steps away from the Start.

But what about direction? Because we are dealing with vector quantities, direction just as important as magnitude. We draw an arrowhead on the purple line to emphasise this.

Students may guess that the direction of the purple ‘resultant’ vector (that is to say, it is the result of adding two vectors) is precisely north-east, but this can be a vague description so let’s use a protractor so that we can find the compass bearing.

And thus we find that the total resultant vector — the result of adding 2 steps north and 2 steps east — is a displacement of 2.8 steps on a compass bearing of 045 degrees.

Resultant vector = total vector: the ‘We’ phase

How would we go about finding the resultant vector if we moved 3 metres north and 4 metres east? If you have access to an interactive whiteboard, you could choose to use this Jamboard for this phase. (One minor inconvenience: you would have to draw the straight lines freehand but you can use the moveable and rotatable ruler and protractor to make measurements ‘live’ with your class.)

We go through a process similar to the one outlined above.

  • What would be a suitable scale?
  • How long should the vertical arrow be?
  • How long should the horizontal arrow be?
  • Where should we place the ‘End’ point?
  • How do we draw the ‘resultant’ vector?
  • What do we mean by ‘resultant vector’?
  • How should we show the direction of the resultant vector?
  • How do we find its length?
  • How do we convert the length of the arrow on the scale diagram into the magnitude of the displacement in real life?

The resultant vector is, of course, 5.0 m at a compass bearing of 053 degrees.

Resultant vector = total vector: the ‘You’ phase

Students can complete the questions on the worksheets which can be printed from the PowerPoint below.

Answers are shown on this second PowerPoint, plus an optional digital ruler and protractor are included on the third slide if you wish to use them.

Enjoy!