Electromagnetic induction — using the LEFT hand rule…?

They do observe I grow to infinite purchase,
The left hand way;

John Webster, The Duchess of Malfi

Electromagnetic induction — the fact that moving a conductor inside a magnetic field in a certain direction will generate (or induce) a potential difference across its ends — is one of those rare-in-everyday-life phenomena that students very likely will never have come across before. In their experience, potential differences have heretofore been produced by chemical cells or by power supply units that have to be plugged into the mains supply. Because of this, many of them struggle to integrate electromagnetic induction (EMI) into their physical schema. It just seems such a random, free floating and unconnected fact.

What follows is a suggested teaching sequence that can help GCSE-level students accept the physical reality of EMI without outraging their physical intuition or appealing to a sketchily-explained idea of ‘cutting the field lines’.

‘Look, Ma! No electrical cell!’

I think it is immensely helpful for students to see a real example of EMI in the school laboratory, using something like the arrangement shown below.

A length of copper wire used to cut the magnetic field between two Magnadur magnets on a yoke will induce (generate) a small potential difference of about 5 millivolts. What is particularly noteworthy about doing this as a class experiment is how many students ask ‘How can there be a potential difference without a cell or a power supply?’

The point of this experiment is that in this instance the student is the power supply: the faster they plunge the wire between the magnets then the larger the potential difference that will be induced. Their kinetic energy store is being used to generate electrical power instead of the more usual chemical energy store of a cell.

But how to explain this to students?

A common option at this point is to start talking about the conductor cutting magnetic field lines: this is hugely valuable, but I recommend holding fire on this picture for now — at least for novice learners.

What I suggest is that we explain EMI in terms of a topic that students will have recently covered: the motor effect.

This has two big ‘wins’:

  • It gives a further opportunity for students to practice and apply their knowledge of the motor effect.
  • Students get the chance to explain an initially unknown phenomenon (EMI) in terms of better understood phenomenon (motor effect). The motor effect will hopefully act as the footing (to use a term from the construction industry) for their future understanding of EMI.

Explaining EMI using the motor effect

The copper conductor contains many free conduction electrons. When the conductor is moved sharply downwards, the electrons are carried downwards as well. In effect, the downward moving conductor can be thought of as a flow of charge; or, more to the point, as an electrical current. However, since electrons are negatively charged, this downward flow of negative charge is equivalent to an upward flow of positive charge. That is to say, the conventional current direction on this diagram is upwards.

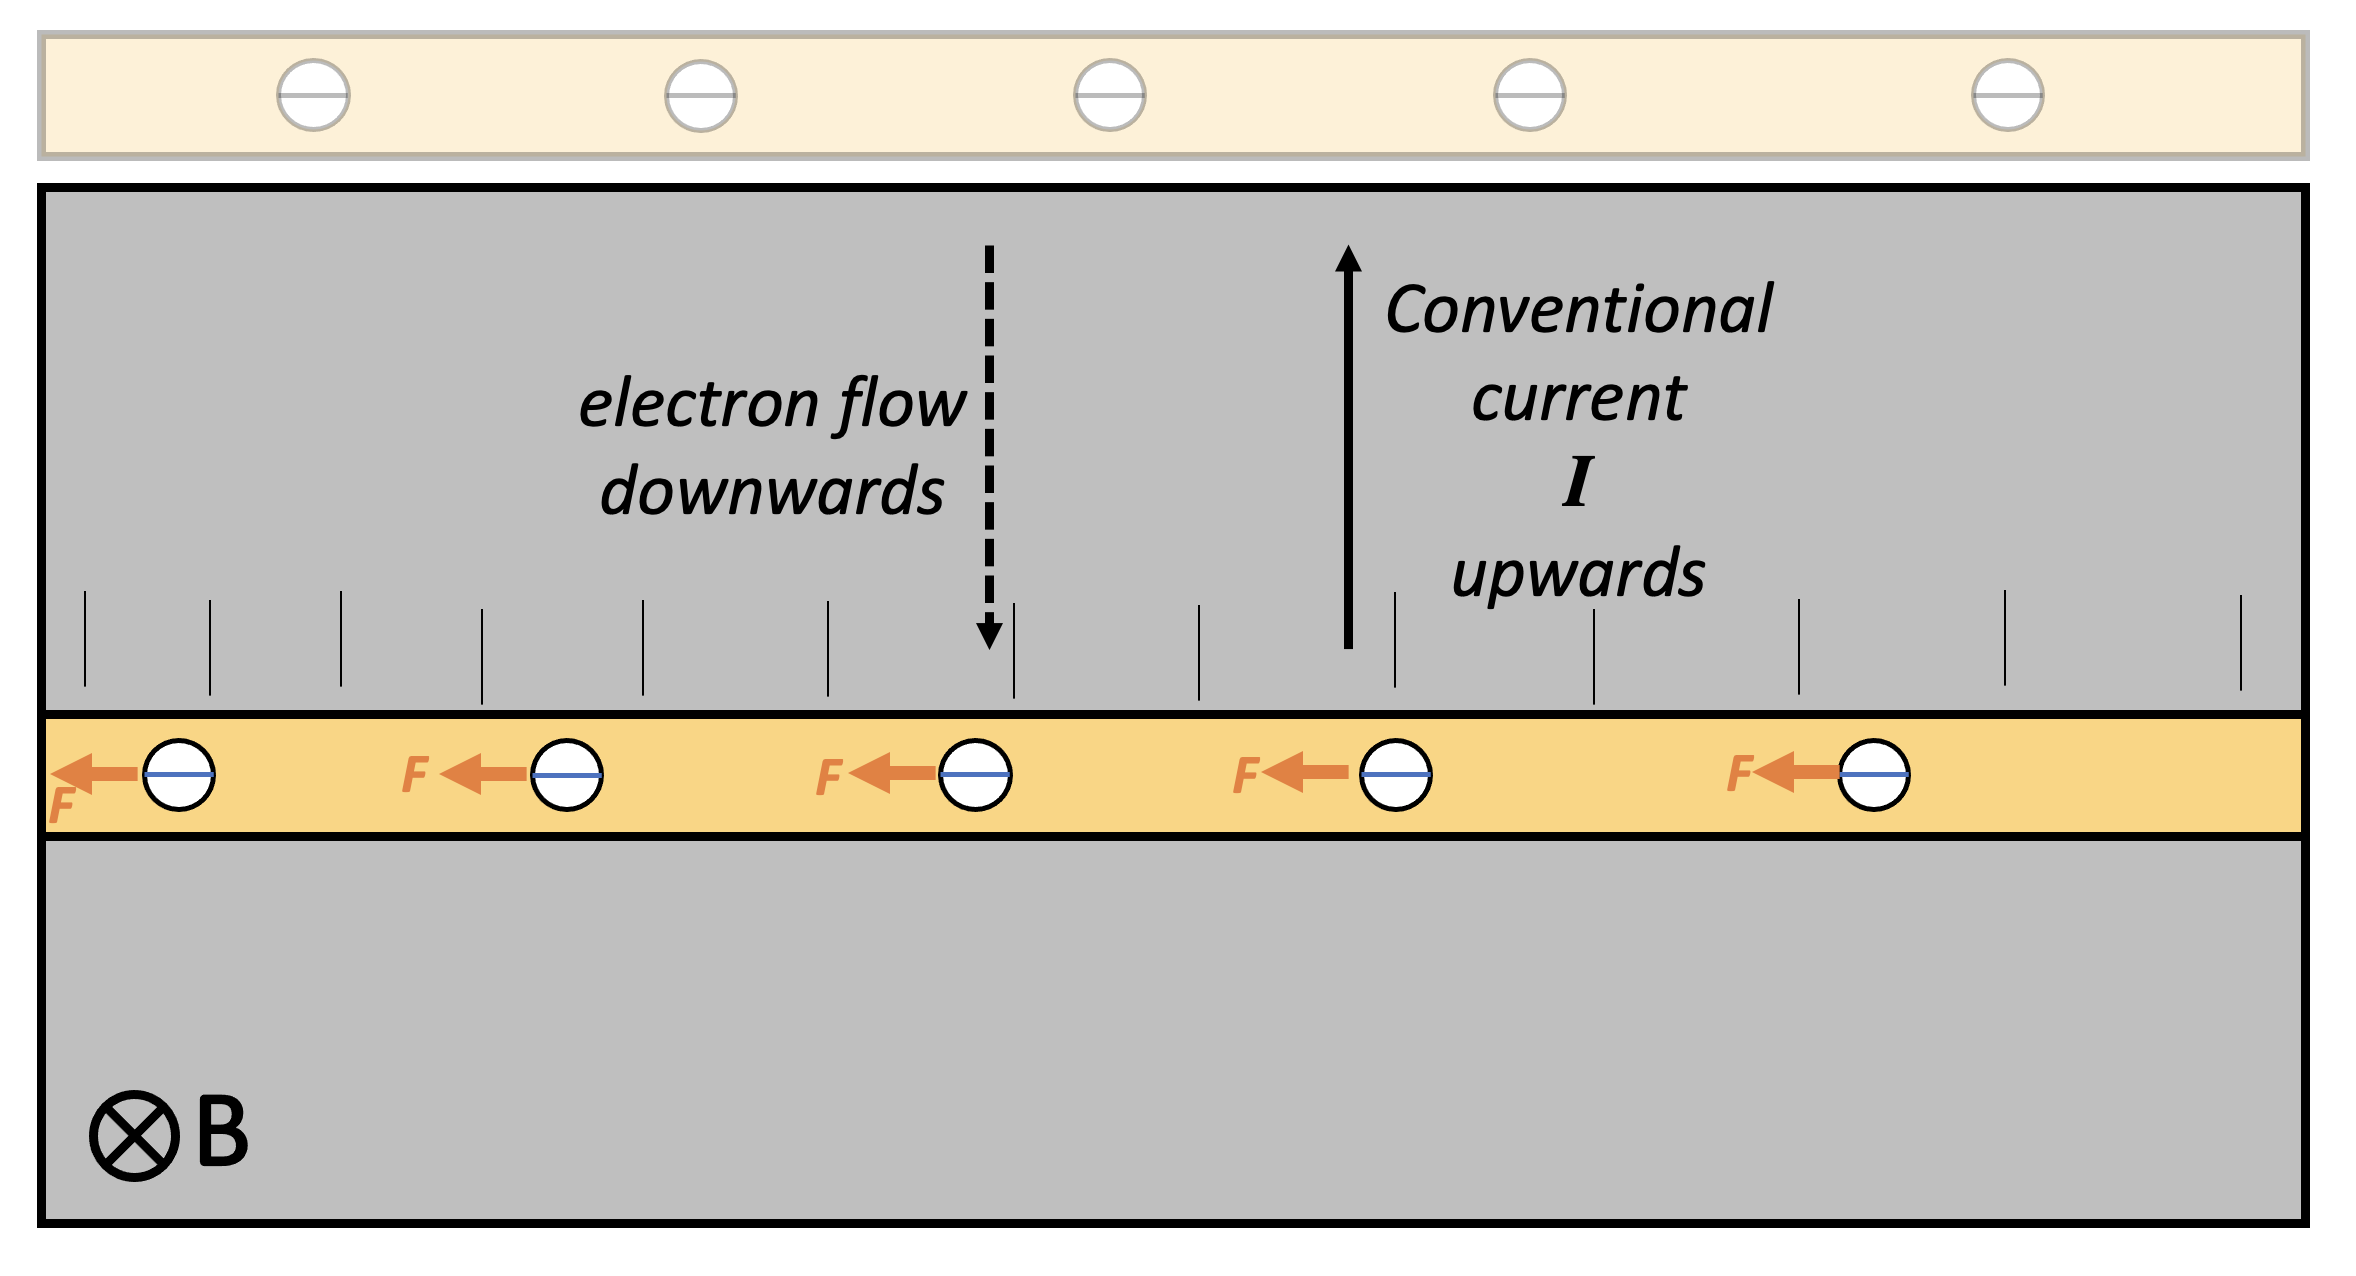
Applying Fleming Left Hand Rule (FLHR) to this instance, we find that each electron experiences a small force tugging it to the left — but only while the conductor is being moved downwards.

This results in the left hand side of the conductor becoming negatively charged and the right hand side becoming positively charged: in short, a potential difference builds up across the conductor. This potential difference only happens when the conductor is moving through the magnetic field in such a way that the electrons are tugged towards one end of the conductor. (There is, of course, the Hall Effect in some other instances, but we won’t go into that here.)

As soon as the conductor stops moving, the potential difference is no longer induced as there is no ‘charge flow’ through the magnetic field and, hence, no current and no FLHR motor effect force acting on the electrons.

Faraday’s model of electromagnetic induction

Michael Faraday (1791-1867) discovered the phenomenon of electromagnetic induction in 1831 and explained it using the idea of a conductor cutting magnetic field lines. This is an immensely valuable model which not only explains EMI but can also generate quantitative predictions and, yes, it should definitely be taught to students — but perhaps the approach outlined above is better to introduce EMI to students.

The left hand rule not knowing what the right hand rule is doing . . .

We usually apply Fleming’s Right Hand Rule (FRHW) to cases of EMI, Can we replace its use with FLHR? Perhaps, if you wanted to. However, FRHR is a more direct and straightforward shortcut to predicting the direction of conventional current in this type of situation.

Visualising How Transformers Work

‘Transformers’ is one of the trickier topics to teach for GCSE Physics and GCSE Combined Science.

I am not going to dive into the scientific principles underlying electromagnetic induction here (although you could read this post if you wanted to), but just give a brief overview suitable for a GCSE-level understanding of:

  • The basic principle of a transformer; and
  • How step down and step up transformers work.

One of the PowerPoints I have used for teaching transformers is here. This is best viewed in presenter mode to access the animations.

The basic principle of a transformer

A GIF showing the basic principle of a transformer.
(BTW This can be copied and pasted into a presentation if you wish,)

The primary and secondary coils of a transformer are electrically isolated from each other. There is no charge flow between them.

The coils are also electrically isolated from the core that links them. The material of the core — iron — is chosen not for its electrical properties but rather for its magnetic properties. Iron is roughly 100 times more permeable (or transparent) to magnetic fields than air.

The coils of a transformer are linked, but they are linked magnetically rather than electrically. This is most noticeable when alternating current is supplied to the primary coil (green on the diagram above).

The current flowing in the primary coil sets up a magnetic field as shown by the purple lines on the diagram. Since the current is an alternating current it periodically changes size and direction 50 times per second (in the UK at least; other countries may use different frequencies). This means that the magnetic field also changes size and direction at a frequency of 50 hertz.

The magnetic field lines from the primary coil periodically intersect the secondary coil (red on the diagram). This changes the magnetic flux through the secondary coil and produces an alternating potential difference across its ends. This effect is called electromagnetic induction and was discovered by Michael Faraday in 1831.

Energy is transmitted — magnetically, not electrically — from the primary coil to the secondary coil.

As a matter of fact, a transformer core is carefully engineered so to limit the flow of electrical current. The changing magnetic field can induce circular patterns of current flow (called eddy currents) within the material of the core. These are usually bad news as they heat up the core and make the transformer less efficient. (Eddy currents are good news, however, when they are created in the base of a saucepan on an induction hob.)

Stepping Down

One of the great things about transformers is that they can transform any alternating potential difference. For example, a step down transformer will reduce the potential difference.

A GIF showing the basic principle of a step down transformer.
(BTW This can be copied and pasted into a presentation if you wish,)

The secondary coil (red) has half the number of turns of the primary coil (green). This halves the amount of electromagnetic induction happening which produces a reduced output voltage: you put in 10 V but get out 5 V.

And why would you want to do this? One reason might be to step down the potential difference to a safer level. The output potential difference can be adjusted by altering the ratio of secondary turns to primary turns.

One other reason might be to boost the current output: for a perfectly efficient transformer (a reasonable assumption as their efficiencies are typically 90% or better) the output power will equal the input power. We can calculate this using the familiar P=VI formula (you can call this the ‘pervy equation’ if you wish to make it more memorable for your students).

Thus: Vp Ip = Vs Is so if Vs is reduced then Is must be increased. This is a consequence of the Principle of Conservation of Energy.

Stepping up

A GIF showing the basic principle of a step up transformer.
(BTW This can be copied and pasted into a presentation if you wish,)

There are more turns on the secondary coil (red) than the primary (green) for a step up transformer. This means that there is an increased amount of electromagnetic induction at the secondary leading to an increased output potential difference.

Remember that the universe rarely gives us something for nothing as a result of that damned inconvenient Principle of Conservation of Energy. Since Vp Ip = Vs Is so if the output Vs is increased then Is must be reduced.

If the potential difference is stepped up then the current is stepped down, and vice versa.

Last nail in the coffin of the formula triangle…

Although many have tried, you cannot construct a formula triangle to help students with transformer calculations.

Now is your chance to introduce students to a far more sensible and versatile procedure like FIFA (more details on the PowerPoint linked to above)

Nature Abhors A Change In Flux

Aristotle memorably said that Nature abhors a vacuum: in other words. he thought that a region of space entirely devoid of matter, including air, was logically impossible.

Aristotle turned out to be wrong in that regard, as he was in numerous others (but not quite as many as we – secure and perhaps a little complacent and arrogant as we look down our noses at him from our modern scientific perspective – often like to pretend).

An amusing version which is perhaps more consistent with our current scientific understanding was penned by D. J. Griffiths (2013) when he wrote: Nature abhors a change in flux.

Magnetic flux (represented by the Greek letter phi, Φ) is a useful quantity that takes account of both the strength of the magnetic field and its extent. It is the total ‘magnetic flow’ passing through a given area. You can also think of it as the number of magnetic field lines multiplied by the area they pass through so a strong magnetic field confined to a small area might have the same flux (or ‘effect’) as weaker field spread out over a large area.


Lenz’s Law

Emil Lenz formulated an earlier statement of the Nature abhors a change of flux principle when he stated what I think is the most consistently underrated laws of electromagnetism, at least in terms of developing students’ understanding:

The current induced in a circuit due to a change in a magnetic field is directed to oppose the change in flux and to exert a mechanical force which opposes the motion.

Lenz’s Law (1834)

This is a qualitative rather than a quantitive law since it is about the direction, not the magnitude, of an induced current. Let’s look at its application in the familiar A-level Physics context of dropping a bar magnet through a coil of wire.


Dropping a magnet through a coil in pictures

Picture 1

In picture 1 above, the magnet is approaching the coil with a small velocity v. The magnet is too far away from the coil to produce any magnetic flux in the centre of the coil. (For more on the handy convention I have used to draw the coils and show the current flow, please click on this link.) Since there is no magnetic flux, or more to the point, no change in magnetic flux, then by Faraday’s Law of Electromagnetic Induction there is no induced current in the coil.

Picture 2

in picture 2, the magnet has accelerated to a higher velocity v due to the effect of gravitational force. The magnet is now close enough so that it produces a magnetic flux inside the coil. More to the point, there is an increase in the magnetic flux as the magnet gets closer to the coil: by Faraday’s Law, this produces an induced current in the coil (shown using the dot and cross convention).

To ascertain the direction of the current flow in the coil we can use Lenz’s Law which states that the current will flow in such a way so as to oppose the change in flux producing it. The red circles show the magnetic field lines produced by the induced current. These are in the opposite direction to the purple field lines produced by the bar magnet (highlighted yellow on diagram 2): in effect, they are attempting to cancel out the magnetic flux which produce them!

The direction of current flow in the coil will produce a temporary north magnetic pole at the top of the coil which, of course, will attempt to repel the falling magnet; this is ‘mechanical force which opposes the motion’ mentioned in Lenz’s Law. The upward magnetic force on the falling magnet will make it accelerate downward at a rate less than g as it approaches the coil.

Picture 3

In picture 3, the purple magnetic field lines within the volume of the coil are approximately parallel so that there will be no change of flux while the magnet is in this approximate position. In other words, the number of field lines passing through the cross-sectional area of the coil will be approximately constant. Using Faraday’s Law, there will be no flow of induced current. Since there is no change in flux to oppose, Lenz’s Law does not apply. The magnet will be accelerating downwards at g.

Picture 4

As the magnet emerges from the bottom of the coil, the magnetic flux through the coil decreases. This results in a flow of induced current as per Faraday’s Law. The direction of induced current flow will be as shown so that the red field lines are in the same direction as the purple field lines; Lenz’s Law is now working to oppose the reduction of magnetic flux through the coil!

A temporary north magnetic pole is generated by the induced current at the lower end of the coil. This will produce an upward magnetic force on the falling magnet so that it accelerates downward at a rate less than g. This, again, is the ‘mechanical force which opposes the motion’ mentioned in Lenz’s Law.


Dropping a magnet through a coil in graphical form

This would be one of my desert island graphs since it is such a powerfully concise summary of some beautiful physics.

The graph shows the reversal in the direction of the current as discussed above. Also, the maximum induced emf in region 2 (blue line) is less than that in region 4 (red line) since the magnet is moving more slowly.

What is more, from Faraday’s Law (where ℇ is the induced emf and N is total number of turns of the coil), the blue area is equal to the red area since:

and N and ∆Φ are fixed values for a given coil and bar magnet.

As I said previously, there is so much fascinating physics in this graph that I think it worth exploring in depth with your A level Physics students 🙂

Other news

If you have enjoyed this post, then you may be interested to know that I’ve written a book! Cracking Key Concepts in Secondary Science (co-authored with Adam Boxer and Heena Dave) is due to be published by Corwin in July 2021.

References

Lenz, E. (1834), “Ueber die Bestimmung der Richtung der durch elektodynamische Vertheilung erregten galvanischen Ströme”, Annalen der Physik und Chemie107 (31), pp. 483–494

Griffiths, David (2013). Introduction to Electrodynamics. p. 315.