It is a truth universally acknowledged that student misconceptions about waves are legion. Why do so many students find understanding waves so difficult?
David Hammer (2000: S55) suggests that it may, in fact, be not so much a depressingly long list of ‘wrong’ ideas about waves that need to be laboriously expunged; but rather the root of students misconceptions about waves might be a simple case of miscategorisation.
Hammer (building on the work of di Sessa, Wittmann and others) suggests that students are predisposed to place waves in the category of object rather than the more productive category of event.
Thinking of a wave as an object imbues them with a notional permanence in terms of shape and location, as well as an intuitive sense of ‘weightiness’ or ‘mass’ that is permanently associated with the wave.
Looking at a wave through this p-prim or cognitive filter, students may assume that it can be understood in ways that are broadly similar to how an object is understood: one can simply look at or manipulate the ‘object’ whilst ignoring its current environment and without due consideration of its past or its future
For example, students who think that (say) flicking a slinky spring harder will produce a wave with a faster wave speed rather than the wave speed being dependent on the tension in the spring. They are using the misleading analogy of how an object such as a ball behaves when thrown harder rather than thinking correctly about the actual physics of waves.
A series of undulating events…
Hammer suggests that perhaps a more productive cognitive resource that we should seek to activate in our students when learning about waves is that of an event.
An event can be expected to have a location, a duration, a time of occurrence and a cause. Events do not necessarily possess the aspects of permanence that we typically associate with objects; that is to say, an event is expected to be a transient phenomenon that we can learn about by looking, yes, but we have to be looking at exactly the right place at the right time. We also cannot consider them independently of their environment: events have an effect on their immediate environment and are also affected by the environment.
If students think of waves as a series of events propagating through space they are less likely to imbue them with ‘permanent’ properties such as a fixed shape that can be examined at leisure rather than having to be ‘captured’ at one instant. Hammer suggests using a row of falling dominoes to introduce this idea, but you might also care to use this suggested procedure.
You can access an editable copy of the slides that follow in Google Jamboard format by clicking on this link.
Teaching Refraction Step 1: Breaking = bad waves
I like to start by anchoring the idea of changing wave speed in a context that students may be familiar with: waves on a beach. However, we should try and separate the general idea of an undulating water wave from that of a breaking wave. Begin by asking this question:

Give thirty seconds thinking time and then ask students to hold up either one or two fingers on 3-2-1-now! to show their preferred answer. (‘Finger voting’ is a great method for ensuring that every student answers without having to dig out those mini whiteboards).
The correct answer is, of course, the top diagram. This is because the bottom diagram shows a breaking wave.
Teaching Refraction Step 2: Why do waves ‘break’?
In short, because waves slow down as they hit the beach. The top part of the wave is moving faster than the bottom so the wave breaks up as it slides off the bottom part. In effect, the wave topples over because the bottom is moving more slowly than the top part.

It is important that students appreciate that although the wavelength of the wave does change, the frequency of the wave does not. The frequency of the wave depends on the weather patterns that produced the wave in the deep ocean many hundreds or thousand of miles away. The slope of the beach cannot produce more or fewer waves per second. In other words, the frequency of a wave depends on its history, not its current environment.
All the beach can do is change the wave speed, not the wave frequency.
Teaching Refraction Step 3: the view from above
We can check our students’ understanding by asking them to comment or annotate a diagram similar to the one below.

Some good questions to ask — before the wavelength annotations are added — are:
- Are we viewing the waves from above or from the side? (From above.)
- Can we tell where the crests of the waves are? (Yes, where the line of foam are.)
- Can we tell where the troughs of the waves are? (Yes, midway between the crests.)
- Can we measure the wavelength of the waves? (Yes, the crest to crest distance.)
- Can we tell if the waves are speeding up or slowing down as they reach the shore? (Yes, the waves are bunching together which suggests that slow down as they reach the shore.)
Teaching Refraction Step 4: Understanding the ripple tank

Physics teachers often assume that the operation and principles of a ripple tank are self-evident to students. In my experience, they are not and it is worth spending a little time exploring and explaining how a ripple tank works.
Teaching Refraction Step 5: the view from the side
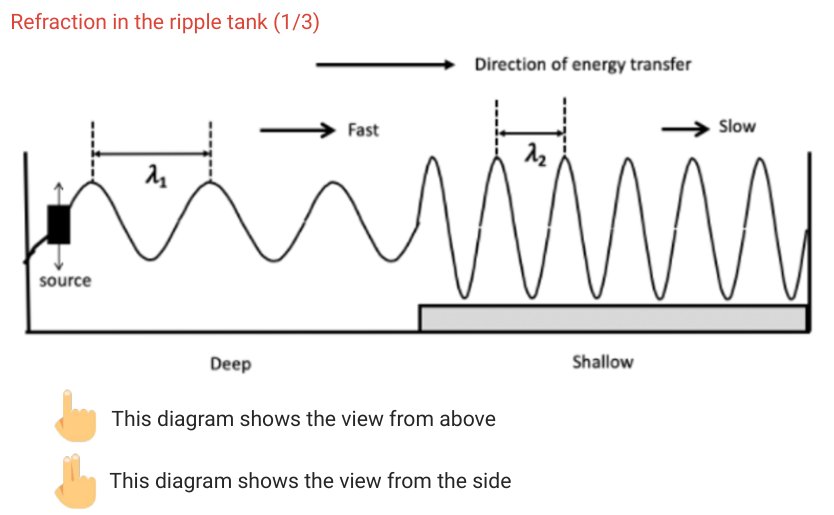
Teaching Refraction Step 6: Seeing refraction in the ripple tank (1)
It’s a good idea to first show what happens when the waves hit the boundary at right angles; in other words, when the direction of travel of the waves is parallel to the normal line.
I like to add the annotations live with the class using Google Jamboard. (The questions can be covered with a blank box until you are ready to show them to the students.)

You can access an animated, annotable version of this and the other slides in this post in Google Jamboard format by clicking on this link.
Teaching Refraction Step 7: Seeing refraction in the ripple tank (2)
The next step is to show what happens when the water waves arrive at the boundary at an angle i; in other words, the direction of travel of the waves makes an angle of i degrees with the normal line.
Again, I like to add the annotations live using Google Jamboard.
References
Hammer, D. (2000). Student resources for learning introductory physics. American Journal of Physics, 68(S1), S52-S59.
Wittmann, M. C., Steinberg, R. N., & Redish, E. F. (1999). Making sense of how students make sense of mechanical waves. The physics teacher, 37(1), 15-21.
